
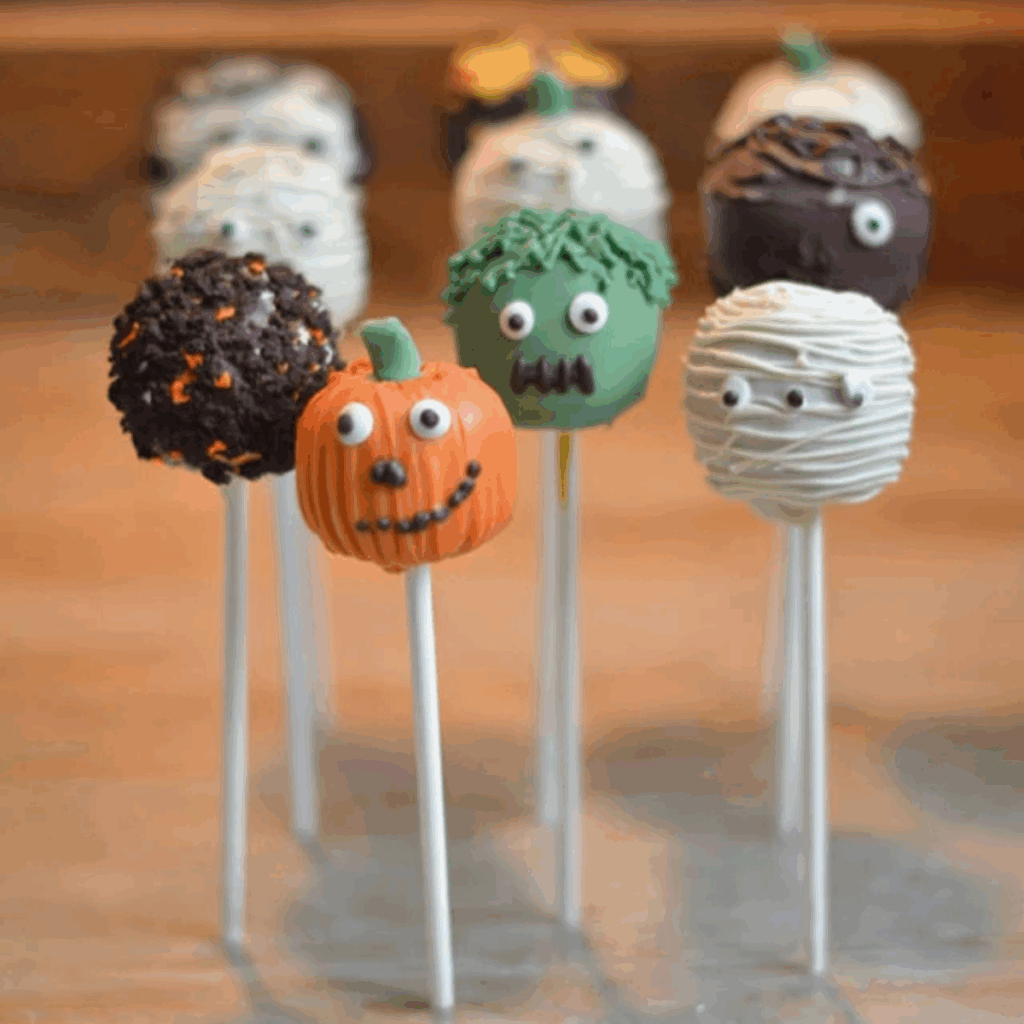
Halloween Cake Pops are the perfect addition to any spooky celebration. These bite-sized, spooky delights come in fun and creative designs, like Frankenstein, pumpkins, and mummies, making them a hit at Halloween parties. Whether you’re hosting a get-together with friends or looking for a festive treat to enjoy with your family, these Halloween cake pops are sure to impress.

Table of Contents
Why Halloween Cake Pops Are Perfect for Your Celebration
Halloween cake pops are not only delicious, but they are also visually appealing, adding a touch of creativity to your Halloween spread. These treats are ideal for kids and adults alike, offering a fun and festive way to enjoy cake. Plus, they are incredibly versatile – you can make them with either vanilla or chocolate cake, making them customizable for different tastes. They are easy to handle, requiring no utensils, and the best part is that they can be decorated in a variety of spooky themes, including pumpkins, Frankenstein, and mummies.
Ingredients for Halloween Cake Pops
To make these spooky cake pops, you will need the following ingredients:
- Cake Mix: Forms the base of the cake pops. Choose vanilla or chocolate for variety.
- Butter: Adds richness and flavor to the cake.
- Eggs: Provide structure to the cake mixture.
- Frosting: Helps bind the cake together for shaping into pops and adds sweetness.
- Candy Coating or Chocolate: Used for coating the cake pops to give them their signature look and flavor.
- Sprinkles or Edible Decorations: For spooky Halloween designs, such as Frankenstein faces, mummy eyes, and pumpkin features.
Alternative Ingredient Suggestions
If you have dietary preferences or restrictions, there are some easy swaps you can make for Halloween cake pops:
- Gluten-Free Cake Mix: Use a gluten-free cake mix to make these cake pops suitable for those with gluten sensitivities.
- Dairy-Free Butter and Frosting: Opt for plant-based butter and dairy-free frosting if you’re catering to dairy-free guests.
- Dark Chocolate: For a richer taste, dark chocolate can be used for the coating instead of milk chocolate or candy melts.
Step-by-Step Instructions to Make Halloween Cake Pops
- Prepare the Cake: Begin by baking your cake according to the instructions on the box. Once the cake is done, let it cool completely before proceeding to the next step.
- Crumble the Cake: After the cake has cooled, use your hands or a fork to crumble the cake into fine crumbs in a large bowl.
- Mix with Frosting: Gradually add frosting to the cake crumbs, mixing it until the consistency is moist and sticky enough to roll into balls.
- Form Cake Pops: Roll the mixture into 1-inch balls, pressing gently to hold their shape. Place them on a baking sheet or tray.
- Dip the Sticks: To secure the cake pops on sticks, dip each stick into melted candy coating or chocolate and then insert it into the center of each cake ball. This will help the stick stay in place.
- Chill the Cake Pops: Refrigerate the cake pops for about 30 minutes to ensure they set properly.
- Coat with Chocolate: Once the cake pops have chilled, dip each one into the melted candy coating or chocolate. Make sure to cover the entire cake pop and tap off any excess.
- Decorate the Cake Pops: Before the coating hardens, decorate your cake pops with Halloween-themed sprinkles, edible eyes, or other spooky designs.
- Let Dry: Place the decorated cake pops back onto the tray and allow the coating to harden completely before serving.
Tips & Tricks for Perfect Halloween Cake Pops
- Don’t Overwork the Cake: When mixing the cake crumbs with frosting, avoid overworking the mixture. Too much mixing can lead to a dense texture.
- Check Coating Temperature: Ensure the candy coating or chocolate is not too hot when dipping the cake pops. If it’s too hot, it can cause the cake to fall apart.
- Use Fresh Ingredients: For the best flavor, make sure to use fresh cake mix and frosting. This will make the cake pops more flavorful and enjoyable.
Pairing Ideas and Variations
Halloween cake pops are perfect on their own, but they can also be paired with other Halloween treats to complete your party spread. Consider serving them alongside:
- Halloween Cookies: Chocolate chip or sugar cookies decorated with Halloween designs.
- Spooky Punch: Serve with a fun, spooky drink, such as a “blood-red” fruit punch or a pumpkin-spiced cocktail.
- Candy Corn: These colorful treats can complement your Halloween cake pops, adding a bright and festive touch.
Seasonal and Health Benefits
While Halloween cake pops are mostly a fun treat, you can also add a seasonal twist by incorporating fall flavors like cinnamon, nutmeg, or pumpkin into the cake mixture or coating. This seasonal addition not only enhances the flavor but also brings a warm and cozy autumn vibe to your Halloween celebration. Additionally, if you swap out ingredients like using a gluten-free cake mix or dairy-free frosting, you can cater to various dietary preferences, making sure everyone can enjoy these delicious treats.
Halloween cake pops are a fun, easy, and delicious way to celebrate the spooky season. Their bite-sized nature makes them perfect for parties, and their customizability means they can fit any theme, from pumpkins to monsters. Whether you’re looking for a festive treat to enjoy with family or need a fun project to do with kids, these Halloween cake pops are sure to be a crowd favorite.
Conclusion
Halloween Cake Pops are a delightful and creative treat to add to your spooky celebrations. These bite-sized goodies are not only fun to make, but they also allow for endless customization, making them perfect for any Halloween party. With their simple ingredients and easy-to-follow steps, you can create delicious cake pops in various Halloween-inspired designs, such as pumpkins, Frankenstein, and mummies. Whether you’re serving them at a family gathering or sharing them with friends, these treats are sure to leave everyone excited for more!
Frequently Asked Questions
1. How long do Halloween cake pops last?
Halloween cake pops can last up to a week when stored properly in an airtight container at room temperature. If you need to store them longer, you can refrigerate them for up to two weeks. Just make sure to allow them to reach room temperature before serving for the best taste and texture.
2. Can I make Halloween cake pops ahead of time?
Yes! You can prepare Halloween cake pops a day or two ahead of your event. Simply follow all the steps up until decorating and dipping them in chocolate. Once they’ve been coated, store them in an airtight container and keep them in the refrigerator. They’ll stay fresh and ready for serving when you need them.
3. How can I make Halloween cake pops more colorful?
To make your Halloween cake pops more vibrant, try using colored candy melts or adding food coloring to your frosting. You can also decorate with bright sprinkles or edible glitter to make the pops stand out even more.
More Relevant Recipes
- Halloween Crack: A Spooky Sweet Treat for the Season
- Halloween Deviled Eggs: A Spooky Appetizer Perfect for Your Party
- Halloween Chicken Parmesan Sliders: A Spooky Twist on a Classic
Halloween Cake Pops

Halloween Cake Pops are a fun and creative treat perfect for your Halloween celebration. These bite-sized delights can be decorated to look like pumpkins, Frankenstein, and mummies, making them a hit at any spooky party. Easy to make and customize, they are a festive way to enjoy cake in a fun, portable form.
- Prep Time: 30 minutes
- Cook Time: 30 minutes
- Total Time: 1 hour 30 minutes
- Yield: 20–24 cake pops 1x
- Category: Dessert
- Method: Baking
- Cuisine: American
- Diet: Vegetarian
Ingredients
- 1 box cake mix (vanilla or chocolate)
- 1/2 cup butter
- 2 eggs
- 1 cup frosting (store-bought or homemade)
- 2 cups candy melts or chocolate (for coating)
- Halloween-themed sprinkles and edible decorations (optional)
Instructions
- Bake the cake according to the instructions on the cake mix box, then allow it to cool completely.
- Crumble the cooled cake into fine crumbs in a large bowl.
- Gradually mix in the frosting until the mixture is moist and sticky enough to roll into balls.
- Form the cake mixture into 1-inch balls and place them on a tray.
- Dip each cake pop stick into melted candy melts or chocolate, then insert the stick into the center of each cake ball to secure it.
- Chill the cake pops in the fridge for 30 minutes to set.
- Once set, dip each cake pop into the candy coating or chocolate and tap off excess.
- Before the coating hardens, decorate the cake pops with Halloween sprinkles or edible eyes and faces.
- Allow the cake pops to dry completely before serving or storing.
Notes
- Ensure the cake is fully cooled before crumbling to avoid a messy mixture.
- If using dark chocolate for coating, the flavor will be richer compared to milk chocolate.
- Store cake pops in an airtight container at room temperature for up to one week.
- For a vegan option, use dairy-free frosting and plant-based cake mix.
Nutrition
- Serving Size: 1 cake pop
- Calories: 150
- Sugar: 18g
- Sodium: 40mg
- Fat: 7g
- Saturated Fat: 3g
- Unsaturated Fat: 3g
- Trans Fat: 0g
- Carbohydrates: 21g
- Fiber: 0g
- Protein: 1g
- Cholesterol: 20mg


